
Margin Master Handbook
- Prerequisites
- Firewall and Network Requirements
- Microsoft Edge Download Block
- SQL Server Authentication Setup for IT Administrators
- Antivirus and Endpoint Security Exclusions
- SQL Server Tools
- Install or Upgrade SQL Server Express
- Install or Upgrade SQL Server Management Studio
- Database Connection Setup
- Database Creation
- Database Restore
- Transfer Settings from Database
- Connecting a Second Computer
- A Tour of the Main Window
- The Menus
- The Button Row
- The Main Data Grid
- The Summary Section
- Banners and Badges
- The Options Window
- Store Configuration
- Miscellaneous
- Export Options
- Vendor Settings
- POS / Connections Tabs
- Background Service
- AI Assistant (Experimental)
- How POS Import Works
- Supported Point-of-Sale Systems
- Data Import Workflows
- RockSolid POS Import
- Epicor Eagle FTP Import
- Epicor MySQL Compass Import
- Transact POS Import
- Paladin POS Import
- Falcon POS Import
- Spruce POS Import
- Bistrack POS Import
- RockSolid Max POS Import
- ECS POS Import
- Prosperity POS Import
- Catalyst POS Import
- Westlake POS Import
- MI9 POS Import
- AS/400 POS Import
- CounterWorks POS Import
- Dimension POS Import
- PacSoft POS Import
- ProStix POS Import
- Sympac POS Import
- Propello POS Import
- EagleVision POS Import
- MySQL/Compass Connection Configuration
- ECI VPN Requirement (Spruce, RockSolid MAX)
- Propello POS Integration Guide
- Troubleshooting: Epicor Import Brought In 0 SKUs
- PACE POS Import
- Advantage POS Import
- General Store POS Import
- J-3 POS Import
- KeyStroke POS Import
- AutBusSystem POS Import
- Tomax POS Import
- Enterprise POS Import
- Computakey POS Import
- Redisell POS Import
- DART POS Import
- MIB POS Import
- Substruct POS Import
- DMAS POS Import
- RODS POS Import
- Procom POS Import
- Agility POS Import
- Acumen POS Import
- Cruise POS Import
- LSandE POS Import
- Retalix POS Import
- DIBCorp POS Import
- GMROI POS Import
- ECi Advantage POS Import
- Sunray POS Import
- ActivantAutomotive POS Import
- IBS POS Import
- Versys POS Import
- RMS POS Import
- TAMS POS Import
- Integrasoft POS Import
- Dynamic POS Import
- Microsoft ARS POS Import
- CDS POS Import
- Spartan POS Import
- Nitterhouse POS Import
- Jeds POS Import
- Theisens POS Import
- Emery Jensen POS Import
- SMS Pro POS Import
- Burdens POS Import
- Intact POS Import
- Bloom Retail POS Import
- NCR Counterpoint POS Import
- Horizon POS Import
- Cloud Vendor Data Sync
- Data Aging and Freshness Warnings
- Resetting Vendor and POS Data
- Rebuild Data and Rebuild Selection Lists
- Troubleshooting Vendor Sync
- Understanding the Strategy Hierarchy
- Pricing Strategies
- Creating a Strategy Step
- Updating and Deleting Steps
- Reviewing a Strategy and Running It
- Shared (Premade) Strategies
- SKU-Level Exceptions
- Manage Custom Groups
- Strategy Execution Cloud Tracking
- Importing from Excel
- Cost Break Analysis
- Cost Break Strategies
- Min/Max Strategies
- Strategy Backup & Restore
- Add Items from Catalog
- Store Grouping
- Data Diagnostics and Missing Index Recommendations
- System Diagnostics
- Margin Master Cannot Save Settings
- SQL Server 2025 Express vs. Full License
- Support Issue Management
- Catalog Lookup
- What's New After an Update
- Version History
- Documentation and the Help Buttons
- Chat with Support
- CTLD — Do It Best Catalog File
- MARGIN_MASTER — Ace Catalog File
- PCDITEMXREF — Do It Best SKU Classification File
- SAP_ZONE_PRICE_MARGIN_MASTER — Ace Zone Pricing File
- PCDPRODCLASS — Do It Best Product Classification Hierarchy File
- SAP_STORE_DEPT_ZONE_MARGIN_MASTER — Ace Store Zone Assignment File
- Taxonomy — Ace Product Classification File
- Mapp_Pricing — Ace MAP & IMAP Pricing File
- margin_mstr_plano — Ace Planogram File
On This Page
Database Creation
What is this?
Database Creation is a guided feature that walks you through creating a new Margin Master database from within the application. The Create New Database dialog collects your store information, auto-generates a database name, validates your license, and then builds the full database -- schema, tables, and initial configuration -- in a single step.
Walk through it in the app: guide 1002 — Creating a new database. Margin Master can walk you through these steps live: turn on Training / Guide Mode from the Help menu, then type 1002 into the Lessons & Guides box — or ask Margin Master support to run it with you.
Key Capabilities
- Dedicated dialog -- a focused form collects store number, vendor, POS system, and RSC
- Auto-generated database name -- the name is built from your store info (e.g.,
Ace_12345_MainStreetHardware_Paladin) and checked for conflicts in real time - License validation -- your store license is verified before creation proceeds
- Automatic setup -- the database is built for your vendor and POS system
- Store configuration -- your store information is saved into the new database automatically
- Verification -- Margin Master checks the finished database before you start using it
- Auto-switch -- the application reconfigures to the new database immediately after creation
- Settings transfer prompt -- after creation, offers to copy settings from an existing database so you don't have to re-enter them
Who is this for?
- New users setting up Margin Master for the first time
- Existing users who need a second database (e.g., a test or training database)
- Support staff helping customers configure a fresh installation or troubleshoot by creating a clean database
How to Access
There are two ways to create a new database:
- From the Database Setup window -- Click the "Create New Database" button (or File > Create New Database from the menu). This is the typical path on first launch.
- From the main application -- Go to File > Database > Create Database. This opens the Create New Database dialog directly, bypassing the setup window.
Both paths open the same Create New Database dialog.
The Create New Database Dialog
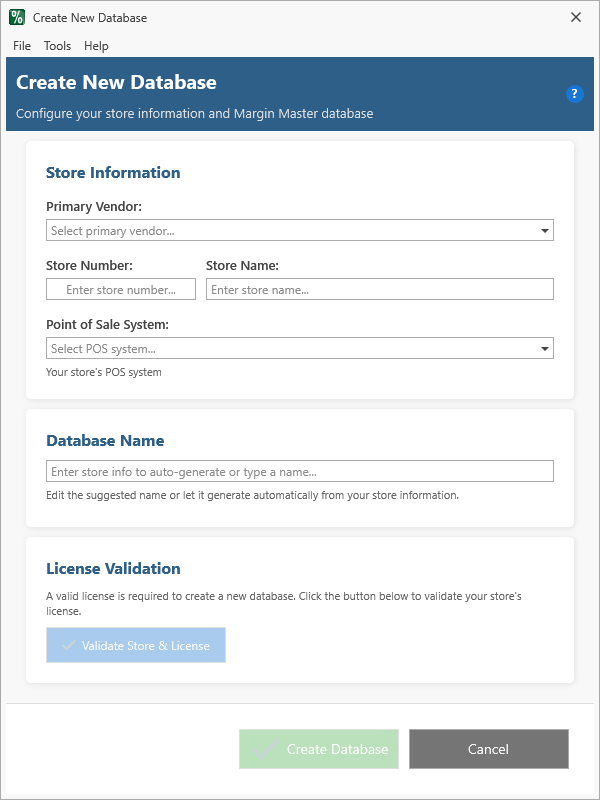
This dialog has three sections:
Store Information
| Field | Description |
|---|---|
| Primary Vendor | Select your primary vendor (Ace Hardware, Do it Best, Orgill, etc.) |
| Store Number | Your store number (4+ digits). Validated against the cloud API -- internet required. A green checkmark appears when validated. |
| Store Name | Populated automatically from the cloud API after store number validation. Can be edited manually. |
| RSC (Retail Support Center) | Only shown for Ace Hardware and Orgill vendors. Select your warehouse/distribution center. |
| Point of Sale System | Select your store's POS system (Epicor, Paladin, RockSolid, Transact, etc.) |
A status message below the store fields shows validation progress and results.
Database Name
The database name is auto-generated from your store information in this format:
{VendorShort}_{StoreNumber}_{StoreName}_{PosShort}
For example: Ace_12345_MainStreetHardware_Paladin
- If the name already exists on the server, a suffix is appended automatically (
-1,-2, etc.) - You can edit the name manually at any time
- A status indicator shows whether the name is available (green) or already exists (red)
License Validation
A valid license is required before you can create a database.
- Fill in all store information above
- Click "Validate Store & License"
- The system contacts the Margin Master licensing server
- On success, a green checkmark and expiration date appear
- The "Create Database" button becomes enabled
Note: License validation requires an internet connection. If store information changes after validation, the license resets and must be re-validated.
Action Buttons
| Button | Description |
|---|---|
| Create Database (green) | Creates the database. Only enabled when all fields are complete, store is validated, name is available, and license is validated. |
| Cancel (gray) | Closes the dialog without creating anything. |
What Happens After You Click "Create Database"
The application creates your database in six steps, showing progress on the splash screen: it confirms the name is still available, creates the empty database, builds it for your vendor and POS system, saves your store information into it, verifies the result, and writes a creation log.
After creation, the application:
- Remembers the new database and makes it the one Margin Master opens
- Switches over to the new database
- Offers to copy settings from an existing database if one exists
Common Questions
Q: What store information do I need? A: Your store number, primary vendor, and POS system type. The store name is fetched automatically from the API.
Q: What if my store number isn't found? A: Verify you entered the correct store number for your vendor. Contact Margin Master support if the store is new or not yet registered.
Q: Can I change the database name? A: Yes. The auto-generated name is editable. Just type your preferred name in the field.
Q: What if the name already exists?
A: The auto-generation adds a suffix (-1, -2, etc.) automatically. You can also type a different name manually.
Q: Do I need an internet connection? A: Yes, for two reasons: (1) store number validation against the cloud API, and (2) license validation with the Margin Master licensing server.