
Margin Master Handbook
- Prerequisites
- Firewall and Network Requirements
- Microsoft Edge Download Block
- SQL Server Authentication Setup for IT Administrators
- Antivirus and Endpoint Security Exclusions
- SQL Server Tools
- Install or Upgrade SQL Server Express
- Install or Upgrade SQL Server Management Studio
- Database Connection Setup
- Database Creation
- Database Restore
- Transfer Settings from Database
- Connecting a Second Computer
- A Tour of the Main Window
- The Menus
- The Button Row
- The Main Data Grid
- The Summary Section
- Banners and Badges
- The Options Window
- Store Configuration
- Miscellaneous
- Export Options
- Vendor Settings
- POS / Connections Tabs
- Background Service
- AI Assistant (Experimental)
- How POS Import Works
- Supported Point-of-Sale Systems
- Data Import Workflows
- RockSolid POS Import
- Epicor Eagle FTP Import
- Epicor MySQL Compass Import
- Transact POS Import
- Paladin POS Import
- Falcon POS Import
- Spruce POS Import
- Bistrack POS Import
- RockSolid Max POS Import
- ECS POS Import
- Prosperity POS Import
- Catalyst POS Import
- Westlake POS Import
- MI9 POS Import
- AS/400 POS Import
- CounterWorks POS Import
- Dimension POS Import
- PacSoft POS Import
- ProStix POS Import
- Sympac POS Import
- Propello POS Import
- EagleVision POS Import
- MySQL/Compass Connection Configuration
- ECI VPN Requirement (Spruce, RockSolid MAX)
- Propello POS Integration Guide
- Troubleshooting: Epicor Import Brought In 0 SKUs
- PACE POS Import
- Advantage POS Import
- General Store POS Import
- J-3 POS Import
- KeyStroke POS Import
- AutBusSystem POS Import
- Tomax POS Import
- Enterprise POS Import
- Computakey POS Import
- Redisell POS Import
- DART POS Import
- MIB POS Import
- Substruct POS Import
- DMAS POS Import
- RODS POS Import
- Procom POS Import
- Agility POS Import
- Acumen POS Import
- Cruise POS Import
- LSandE POS Import
- Retalix POS Import
- DIBCorp POS Import
- GMROI POS Import
- ECi Advantage POS Import
- Sunray POS Import
- ActivantAutomotive POS Import
- IBS POS Import
- Versys POS Import
- RMS POS Import
- TAMS POS Import
- Integrasoft POS Import
- Dynamic POS Import
- Microsoft ARS POS Import
- CDS POS Import
- Spartan POS Import
- Nitterhouse POS Import
- Jeds POS Import
- Theisens POS Import
- Emery Jensen POS Import
- SMS Pro POS Import
- Burdens POS Import
- Intact POS Import
- Bloom Retail POS Import
- NCR Counterpoint POS Import
- Horizon POS Import
- Cloud Vendor Data Sync
- Data Aging and Freshness Warnings
- Resetting Vendor and POS Data
- Rebuild Data and Rebuild Selection Lists
- Troubleshooting Vendor Sync
- Understanding the Strategy Hierarchy
- Pricing Strategies
- Creating a Strategy Step
- Updating and Deleting Steps
- Reviewing a Strategy and Running It
- Shared (Premade) Strategies
- SKU-Level Exceptions
- Manage Custom Groups
- Strategy Execution Cloud Tracking
- Importing from Excel
- Cost Break Analysis
- Cost Break Strategies
- Min/Max Strategies
- Strategy Backup & Restore
- Add Items from Catalog
- Store Grouping
- Data Diagnostics and Missing Index Recommendations
- System Diagnostics
- Margin Master Cannot Save Settings
- SQL Server 2025 Express vs. Full License
- Support Issue Management
- Catalog Lookup
- What's New After an Update
- Version History
- Documentation and the Help Buttons
- Chat with Support
- CTLD — Do It Best Catalog File
- MARGIN_MASTER — Ace Catalog File
- PCDITEMXREF — Do It Best SKU Classification File
- SAP_ZONE_PRICE_MARGIN_MASTER — Ace Zone Pricing File
- PCDPRODCLASS — Do It Best Product Classification Hierarchy File
- SAP_STORE_DEPT_ZONE_MARGIN_MASTER — Ace Store Zone Assignment File
- Taxonomy — Ace Product Classification File
- Mapp_Pricing — Ace MAP & IMAP Pricing File
- margin_mstr_plano — Ace Planogram File
On This Page
Propello POS Integration Guide
What is this?
Propello is a point-of-sale system Margin Master works with for both Ace Hardware and Do it Best stores. It is file-based: you run the inventory export in Propello and Margin Master reads that file, then Margin Master writes your new retails to a CSV that you import back into Propello.
Walk through it in the app: guide 4005 — Importing your Propello data. Margin Master can walk you through these steps live: turn on Training / Guide Mode from the Help menu, then type 4005 into the Lessons & Guides box — or ask Margin Master support to run it with you.
This guide walks through the three things a Propello store does with Margin Master, in order:
- Options settings requirements — set the POS type to Propello and check the import and export folders.
- Importing point-of-sale data — Data > Import Propello Data loads your items from the Propello export file.
- Exporting price changes back to Propello — Print/Export writes a CSV you import in Propello.
1. Options settings requirements
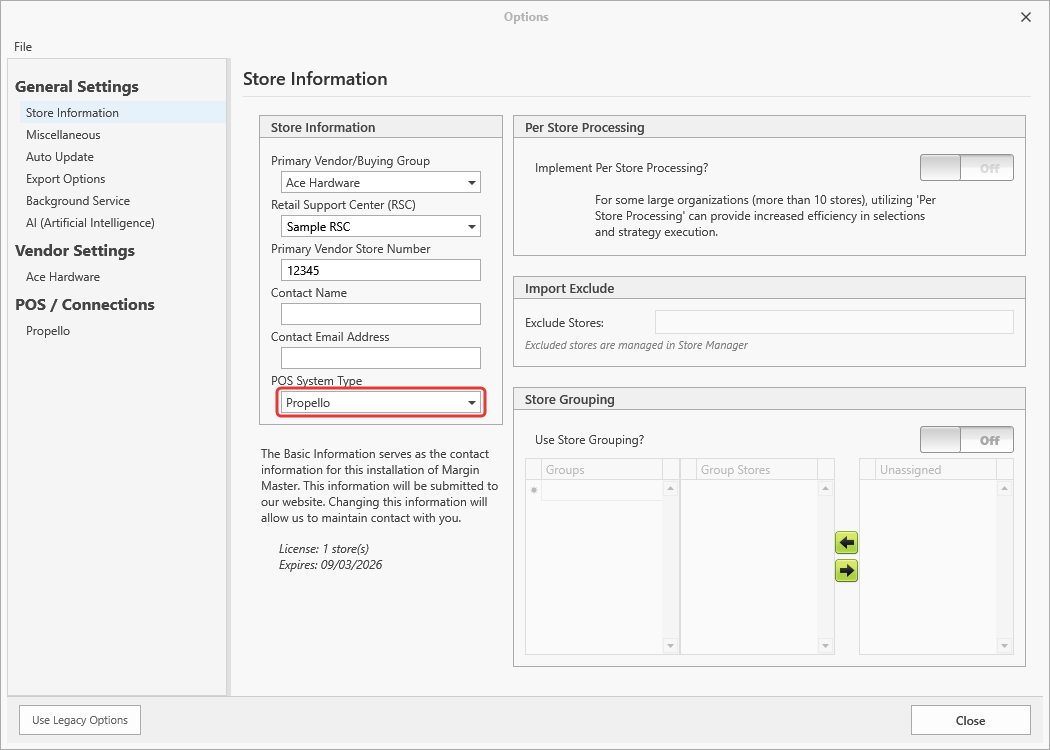
Set the POS System Type to Propello
Open Tools > Options, and on the Store Information tab (under General Settings) set POS System Type to Propello.
Import / Export paths
Tools > Options > General Settings > Miscellaneous, group Import/Export Paths:
- Import Path — where Margin Master picks up the Propello
.xlsxyou exported. - Export Path — where the price-change CSV is written.
Both default to C:\MarginMaster.
2. Importing point-of-sale data
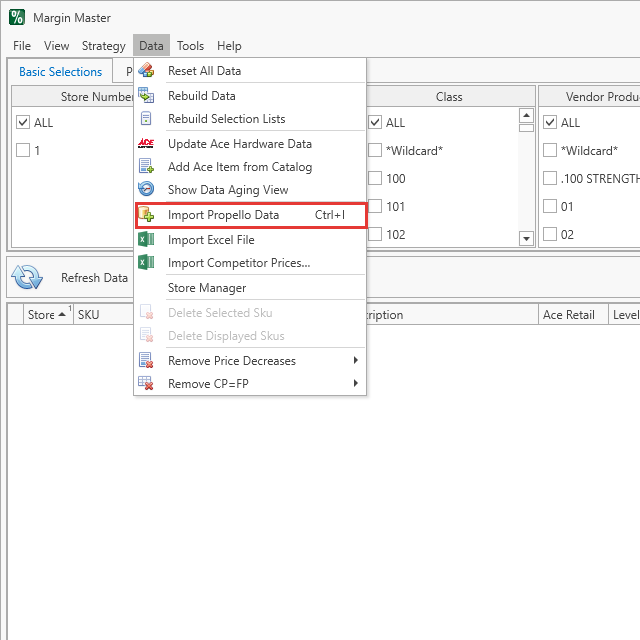
Data > Import Propello Data (Ctrl+I)
For a Propello store the Data menu's POS-import item reads Import Propello Data (other guides call the same item Get POS Data). Press Ctrl+I or click it:
Importing from the export file
- In Propello, run the full inventory export with all columns. A partial export — the Inventory Viewer screen export, for instance — does not carry enough columns and is rejected.
- Save that single
.xlsxinto your Import Path. Keep only one Propello file there at a time. - Choose Data > Import Propello Data.
Margin Master looks in the Import Path for exactly one .xlsx, loads it, shows Successfully Imported N Records, and then runs the normal post-import processing (main table rebuild, selection lists).
| Message | Meaning |
|---|---|
Import File path does not exist! |
The Import Path folder is missing — fix it in Tools > Options > Miscellaneous. |
No Propello Files Found in Import Directory |
Run the full inventory export in Propello and save the .xlsx into the folder named in the message. |
Multiple Propello Excel Files Found in the Import Directory |
Leave only one .xlsx in the folder. |
| Propello Import Failed — This usually means the spreadsheet is not a complete Propello inventory export. | The file did not match the Propello layout (see below). Export the full inventory (all columns) from Propello and try again. |
Column report
The file's headers are checked against the standard Propello column list. A file must match more than 190 standard headers to be accepted; the only columns that must be present are Store #, Item and Retail. Some headers are spelled differently between Propello export layouts (for example Store # vs Store Number, Prim Loc vs Loc 1 - Primary) — both spellings are recognised. Margin Master records the full comparison each time, so support can tell you exactly which columns were missing from a rejected file.
3. Exporting price changes back to Propello
After running a strategy and reviewing future prices, click Print (or File > Print) to open Print/Export:
- Send to: Propello Import CSV File — writes
NewRetails.csvfor you to import in Propello. - The Send to Propello Import CSV File button writes the file. Excel File and Label Master work as for any other POS.
All Records or Range of Records, and the Future Price = $0.00 choices, work exactly as for any file export. Only items with a future price are written.
Send to Propello Import CSV File
- Margin Master writes
{Export Path}\NewRetails.csv(an existing file is replaced) and a timestamped copy underNewRetailsExportHistory\(30-day retention), then reports Exported N Propello Price Changes records to. - In Propello, import the file with the Price Change Import.
The file uses Propello's Price Change Import layout — no header mapping is needed:
| Column | Value |
|---|---|
| Effective Date | Blank — Propello applies the change today. |
| Item | The SKU. |
| Store Number | The store. |
| Sell Price Update Method (Retail) | Always Set Price. |
| New Sell Price Update value (Retail) | The future price (0 – 9999.99). |
The Export Options tab in Tools > Options does not affect this file; its layout is fixed.
Finish in Propello. Margin Master never finalizes price changes. After importing the file, review the changes in Propello, print labels, and finalize them — prices do not change in the store until you do.
Tips
- Always run the full inventory export (all columns). Most import failures are a partial export.
- Remove the previous export from the Import Path before saving a new one, so only one
.xlsxis there. - If a file is rejected, contact support: Margin Master keeps a record of which columns were missing.
Common Questions
Q: Which Propello export do I use?
A: The full inventory export with all columns, saved as .xlsx into the Import Path.
Q: The prices I exported are not in the store yet.
A: Import NewRetails.csv in Propello with the Price Change Import, then finalize the changes in Propello.
Q: Where is the export file?
A: NewRetails.csv in the Export Path, with dated copies in NewRetailsExportHistory\ for 30 days.